Yes, you can use a carpet shampooer on your mattress, especially innerspring types that dry quickly. Strip your bed, vacuum thoroughly, then apply the upholstery attachment with minimal water in small sections. Blot excess moisture after each pass. Avoid over-wetting, which traps moisture and causes mold. Allow 24+ hours of drying between sides using fans, windows, or a dehumidifier. Memory foam and multi-layered mattresses need extra caution due to absorption risks. Follow the complete step-by-step process to protect your investment.
Why Mattress Hygiene Matters for Sleep and Health

Your mattress collects dust mites, dead skin cells, and moisture daily. These accumulate over time, creating an unhealthy sleep surface. Poor mattress hygiene directly affects your rest quality and health.
Your mattress collects dust mites, dead skin cells, and moisture daily, directly affecting your rest quality and health.
Key problems from dirty mattresses:
- Dust mites trigger allergies and respiratory issues
- Moisture buildup enables mold and mildew growth
- Dead skin cells feed bacteria and odors
Regular cleaning reduces these allergens significantly. Cleaning every six months is recommended, more often if you have pets or allergies.
Simple protective measures help:
- Use a mattress protector
- Wash linens weekly
- Control moisture in your bedroom
These steps, combined with periodic stain removal and deeper cleaning, keep your sleeping environment fresh. A clean mattress supports better sleep quality and reduces the risk of allergies, respiratory problems, and skin irritation.

CLEAN MORE CARPET TO SAVE TIME. This machine is designed to save cleaning time and help you get back to your everyday life faster.

ERASE BUILT-UP DIRT & GRIME: Shark CarpetXpert is an upright carpet and upholstery cleaner with built-in spot and stain remover—perfect whole-home cleaning, homes with pets, and erasing the stains of yesteryear.

PROFESSIONAL-LEVEL STAIN REMOVAL AT HOME: Achieve pro results without the cost with the Hoover PowerScrub. Five counter-rotating SpinScrub brushes attack stains from multiple angles while HeatForce technology provides faster drying.
Can You Use a Carpet Shampooer on Your Mattress?

Yes, you can use a carpet shampooer on your mattress, though you’ll need to take some precautions. The right approach makes a real difference in results.
Here’s what works best:
- Use the upholstery attachment to target specific areas safely
- Apply minimal water to avoid over-saturating your mattress
- Choose a gentle water-based solution to protect the fabric
Mattress type matters considerably. Innerspring mattresses dry quickly and handle shampooing well. However, memory foam requires extra care since it absorbs moisture heavily, leading to longer drying times. Allow thorough drying between sides; at least 24 hours is necessary for memory foam types.
Avoid harsh cleaners and aggressive scrubbing, as these damage mattress surfaces. Following these straightforward steps will leave your mattress fresher and cleaner.

STAIN AND UNWANTED SMELL REMOVER: Clorox Urine Remover for Stains and Unwanted smell breaks down urine to eliminate Unwanted smell, not mask it, while the powerful hydrogen peroxide cleaner removes stains

EVERY PURCHASE SAVES PETS. BISSELL proudly supports BISSELL Pet Foundation and its mission to help save homeless pets.

Powerful Cleaning Performance – Compatible with Uwant carpet cleaners, this deep-cleaning formula helps remove common stains such as pet accidents, coffee, wine, food spills, mud, and everyday dirt from fabric surfaces with less scrubbing.
Mattress Types That Can’t Handle Carpet Cleaners

If you own any of these mattress types, consider spot-cleaning by hand instead. Your mattress will benefit from this gentler approach.

【High-Efficiency Deep Cleaning】Our UV mattress vacuum cleaner features a powerful 500W motor, providing 16kPa of strong suction and 30,000 RPM high-frequency tapping. It penetrates deeply into mattresses and fabric layers, effectively removing fine dust, skin flakes. Keep your mattress and sofa consistently fresh and clean, creating a healthier sleep environment and allowing you to enjoy a healthier home life. (NOTE: Not suitable to absorb pet hair)

【Go Beyond Surface Cleaning】Hyper Helix Motor delivers 2 suction levels, 12kPa and 16kPa spiral negative-pressure suction with 33,000-RPM powerful tapping for deep dust removal. The strong cleaning performance of the mattress vacuum cleaner lifts dust, debris, and pet hair from mattresses and sofas, and LED display allows you to monitor cleaning performance in real time for more thorough surface cleaning. This is a great gift for families with pets

【Powerful Deep Cleaning Suction】FEPPO Pro mattress vacuum cleaner features a 550W motor delivers 16KPa spiral suction and 40,000 beats/min to lift fine dust from deep within mattresses, sofas, and Bed. Combined with a wide suction inlet, it efficiently refreshes your bed, couch, and upholstery for a cleaner, healthier home.(NOTE: Not suitable to absorb pet hair)
Gather Your Carpet Cleaner and Supplies

Before you start cleaning, you’ll need to round up the right equipment and materials. Collect everything beforehand so you’re ready to go. This preparation step makes the actual cleaning much smoother and more efficient.
What you’ll want to gather:
- Carpet cleaner with upholstery attachment – This specialized tool prevents oversaturation, which means shorter drying times for your mattress
- Vacuum and baking soda – You’ll use these for initial debris removal and odor elimination
- Mild cleaning solution and clean cloths – These essentials handle stains without damaging your mattress
Don’t forget a dry, absorbent towel for blotting excess moisture. Check your mattress care label to ensure your chosen cleaner works with your specific mattress type. Having everything ready before you start allows you to work efficiently and methodically throughout the process.

CHEMICAL GUYS LIGHTNING FAST STAIN EXTRACTOR (SPI_191_16) – Professional-strength stain remover formula penetrates deep into carpet, upholstery, and fabric to quickly break down and lift stains, dirt, and odors for a restored, like-new look

COMBAT CARPET STAINS FAST: Carpets show stains quickly, especially in busy, high-traffic areas. This 2-in-1 Oxy-Powered Carpet Cleaner is made for targeted spot removal and helps tackle even older, set-in-looking stains up to 7 days old, while refreshing carpets so living spaces stay cleaner and ready for everyday life and unexpected messes

Powerful Cleaning (CWS21916SW) - Ready-to-use Chemical Guys fabric cleaner spray breaks down dirt, grime, and stains from carpets, seats, and floor mats while leaving behind a fresh citrus scent for a clean and revitalized interior
Prepare Your Mattress for Deep Cleaning

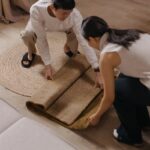
Stripping your bed completely sets you up for success. Remove all bedding, toppers, and sheets first. This prevents dirt transfer during cleaning and lets you wash linens separately.
Next, lift the mattress off the frame. This gives you access to both sides and edges, which is crucial for thorough vacuuming.
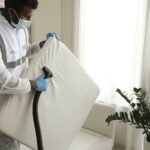
Vacuum thoroughly using an upholstery attachment. Focus on seams, edges, and corners where dust and mites hide.
Check the care label for cleaning guidelines. Then apply pretreatment using a mild cleaning solution on any stains.
For moisture control, sprinkle baking soda across the surface. This absorbs odors and excess moisture.
Finally, ensure edge coverage by lifting sides gently. This prepares every surface for your carpet shampooer.

360° Coverage Protection - Fits 60 inches by 80 inches queen size mattress up to 15 inches deep, fully encasing all sides. The stretchy fabric slips on easily and stays securely in place without shifting. Refer to the installation video below for step-by-step guidance.

Premium Mattress Encasement: Designed to perfectly fit Full size mattresses measuring 54 inches by 75 inches, with an 12 inch deep pocket for a snug, secure fit.

360° Coverage Protection - Fits 78 inches by 80 inches king size mattress up to 15 inches deep, fully encasing all sides. The stretchy fabric fits on easily and stays securely in place without shifting. Refer to the installation video below for step-by-step guidance.
Step-by-Step: Using Your Shampooer Without Over-Wetting
Now let’s focus on the actual shampooing technique to keep your mattress from getting too wet. Apply minimal water, clean section by section, and monitor your moisture levels to prevent excess wetness that can lead to mold and extended drying times. These three steps work together to get your mattress clean while keeping it safe.

GET READY FOR A RELAXING SUMMER WITH COASTAL CLEAN, OUR NEW LIMITED-EDITION COLOR: This soft, silky shade brings a gentle warmth to your home for a peaceful clean you can see and feel.

UNDO TOUGH SPOTS AND STAINS THROUGHOUT YOUR HOME: Shark StainStriker is a portable carpet and upholstery cleaner that delivers powerful tough stain elimination. It’s loaded with a lineup of tools that give you maximum cleaning performance on carpets, rugs, stairs, cars, and more.

Deep Cleaning Power: Features powerful suction, a high-speed brush roll, and PowerSpray high-pressure spray for unbeatable deep carpet cleaning and dirt removal.
Minimal Water Application Technique
How do you clean your mattress without turning it into a soaking wet mess?
The key is using controlled bursts of water. Here’s what I do:
- Attach the upholstery attachment to your shampooer for precise water application
- Work in small sections using short, deliberate bursts to avoid oversaturation
- Blot immediately with a clean cloth after each pass to remove excess moisture
I keep my cleaning solution at low concentration and spray lightly. This approach prevents deep moisture from soaking into your mattress layers, which can lead to mold growth.
After treating each section, I wait until it dries completely before moving on. Your mattress stays fresher longer with this method, and drying happens much faster.
Section-By-Section Cleaning Method
Before you start shampooing, there’s important prep work that makes all the difference. Strip your bedding and vacuum your mattress thoroughly, hitting seams and edges carefully.
Now you’re ready to tackle cleaning in small sections.
Breaking Down Your Mattress
- Divide one side into manageable zones
- Work from top to bottom systematically
- Clean each section before moving forward
Applying the Shampooer
Use your shampooer with water only on small sections. Apply in long, even strokes without oversaturation. Keep suction follow-up passes minimal to prevent over-wetting.
After finishing one side at a time, allow complete drying. Use drying ventilation by opening windows or running a dehumidifier. Once dry, flip your mattress and repeat the process on the opposite face.
This methodical approach prevents moisture damage to your mattress while delivering effective cleaning results.
Monitoring Moisture Levels Carefully
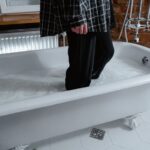
Why does moisture control matter so much when shampooing your mattress? Excess water traps inside, creating mold and mildew that damage your mattress permanently.
I check moisture levels frequently by feeling the surface with my hand. I use a dry cloth to blot away dampness after each pass. This prevents puddling and keeps the mattress barely damp, not soaking wet.
Here’s what I do:
- Feel the surface every few minutes to catch excess moisture early
- Blot thoroughly with clean, dry cloths to remove lingering dampness
- Stop shampooing if the mattress feels overly wet to the touch
After cleaning, I prioritize drying immediately. I open windows for ventilation and sunlight. I also run a dehumidifier to reduce ambient moisture. These steps ensure your mattress dries completely and safely.
Dry Your Mattress Between Sides Properly
Now that you’ve cleaned one side, flip and rotate your mattress while using smart ventilation methods. Leave your mattress on its side to dry completely, then use sunlight and a dehumidifier to speed up the process. Once that side is fully dry, vacuum away any residue and tackle the other side.

Fast Acting Carpet Stain Remover – Activated Oxygen technology breaks up stains right before your eyes. Eliminates stains at the source so they never come back

1. DESTROYS URINE ODORS THE FIRST TIME Urine elimination technology neutralizes and removes odors on contact for immediate freshness

One 64 fl oz refill of OxiClean Large Carpet Cleaner is a carpet cleaner liquid that can be used in any carpet cleaning machine
Flip And Rotate Technique
Once you’ve shampooed one side of your mattress, the drying phase becomes critical to the cleaning process. Follow this flip and rotate technique to ensure even moisture loss across your entire mattress.
Proper Flip and Rotate Strategy
After your first side dries completely, rotate the mattress 180 degrees before flipping it. This prevents new indentations from forming in the same spots. Focus on these elements:
- Maximize airflow by standing the mattress on its side during drying between sides
- Ensure ventilation through open windows and fans to speed moisture management
- Avoid over-wetting during cleaning to shorten overall drying time
Keep plenty of dry time between sides; typically 24 hours or more depending on humidity levels. This mattress drying approach produces thorough, even results that prevent mold growth and odor development while extending mattress lifespan.
Ventilation And Sunlight Methods
Getting your mattress completely dry between sides makes all the difference in preventing mold and musty smells.
Maximize Your Drying Success
Open windows to create cross-ventilation throughout your room. Fresh airflow moves moisture away from your mattress quickly and effectively.
When possible, position your mattress in direct sunlight. Sunlight naturally kills bacteria and accelerates drying considerably.
Boost Drying Power
If you lack sunlight, set up a fan to circulate air across each cleaned side. The airflow speeds up evaporation significantly.
A dehumidifier in your room reduces humidity levels and supports moisture evaporation from deep within the mattress.
Wait Before Flipping
Rotate or flip your mattress only after both sides have fully dried. This prevents trapped moisture and maintains your mattress structure properly.
Prevent Mold and Maintain Between Cleans
How can you keep your mattress fresh and mold-free between shampooings? Consistent moisture control is essential. After you’ve finished your mattress cleaning, allow proper drying time before using the bed again. I recommend:
- Use a mattress protector to reduce moisture penetration and deter mold while maintaining hygiene
- Run a dehumidifier in your bedroom to prevent excess moisture from accumulating in the air
- Inspect regularly for any signs of dampness, especially along seams and edges where moisture hides
I maintain a cleaning schedule every six months, or more often if I live in high humidity areas. Between cleanings, I ensure thorough ventilation by opening windows when possible. These prevention steps keep my mattress healthier and extend its lifespan significantly.

【POWERFUL MOTOR】This professional-grade mattress vacuum cleaner features an upgraded motor with enduring, powerful performance, providing an impressive 17Kpa suction power and a brush speed of 80,000 RPM, significantly enhancing cleaning efficiency. (NOTE: The mattress vacuum is equipped with a roller brush jam protection feature.After turning off the power and clearing any debris around the roller brush, it will return to normal operation.)

【Multi-Function Design】This Xiaolang Cordless Mattress Vacuum Cleaner Is Equipped With 253.7nm Uv-C Light, Intelligent Dust Sensing, Ultrasonic Technology, And High-Frequency Brush Rotation, Which Helps Remove Deep-Seated Fine Dust Particles, Making The Environment Cleaner And Creating A Healthier Sleeping Environment For Your Family

[Powerful 2-Speed Deep Clean - No Debris Survives] Teant mattress vacuum cleaner offers 2 adjustable suction levels up to 18kPa, while the Hyper Helix motor delivers 33,000-RPM powerful tapping to penetrate mattresses, sofas, and fabrics, lifting dust, dander, dual dust cups and washable HEPA filter capture 99.97% of microparticles (as small as 0.3µm) and separate hair to prevent clogs, keeping suction strong for deeper, more consistent cleaning and a fresher sleep space
Recognize When Your Mattress Isn’t Right for Shampooing
Recognize When Your Mattress Isn’t Right for Shampooing
Not every mattress can handle a carpet shampooer’s moisture and heat. Understanding which mattresses pose a real risk is essential.
Memory foam and foam mattresses are vulnerable. These materials absorb water deeply and have long drying times. Shampooing them can lead to mold growth since surface-only cleaning is insufficient for deep moisture removal.
Latex and high-resilience foams also suffer. Heat and moisture cause permanent damage to these materials.
Multi-layered mattresses need caution. Glued-on covers can separate when wet. The internal structure may break down.
Innerspring mattresses are your best option. They dry more quickly and are easier to dry after shampooing.
Professional cleaning is the safest choice for protecting your investment if you’re uncertain about your mattress type.

StainLift Technology. Lift and remove deep down dirt, stains and odors.

EVERY PURCHASE SAVES PETS. Every purchase makes it possible for BISSELL to continue our support of BISSELL Pet Foundation and its mission of saving pets in need.
Encapsulates soil for easy removal
Professional Cleaning as an Alternative
If you’re worried about damaging your mattress with a DIY shampooer, professional cleaners offer a safer solution. Professional mattress cleaning provides guaranteed results without the risk of water damage or chemical harm.
Professional cleaners bring specialized equipment that controls over-wetting and reduces drying time considerably. They understand how to deep clean your mattress without saturating foam or inner components that a carpet shampooer might damage.
Professionals handle these tasks better than DIY methods:
- Extraction power: Hotel-grade upholstery tools remove dirt and moisture effectively
- Complex issues: Stubborn stains, odors, and mold concerns get consistent treatment
- Material safety: Memory foam, latex, and hybrid mattresses stay protected from harsh chemicals
A free quote allows you to explore this option without commitment. Professional cleaning ensures your mattress receives appropriate care based on its specific construction and materials.

Premium Mattress Encasement: Designed to perfectly fit Queen size mattresses measuring 60 inches by 80 inches, with an 12 inch deep pocket for a snug, secure fit.

100% Waterproof - Six-sided premium protection against everyday liquids and stains; 10-year quality guarantee

360° Coverage Protection - Fits 54 inches by 75 inches full size mattress up to 13 inches deep, fully encasing all sides. The stretchy fabric slips on easily and stays securely in place without shifting. Refer to the installation video below for step-by-step guidance.