To paint your plastic bathtub, you’ll need epoxy paint, sandpaper, and safety gear. Remove old caulk, clean thoroughly with degreaser, then sand with 400-grit paper to roughen the surface.
Mix two-part epoxy for five minutes and apply even coats with a foam roller, sanding lightly between applications.
Wait three days before exposing your tub to water for full curing.
Following these steps transforms your worn tub into a fresh, durable finish that resists daily wear and moisture damage.
Assemble Materials and Safety Gear

Before you start painting, gather everything you need and protect yourself from fumes.
Materials you’ll need:
- Caulk removal tool
- 400–600 grit sandpaper
- Tub cleaner
- Tack cloth
- Painters tape and plastic sheets
- Foam roller or high-quality brush
- Epoxy two-part tub paint (Part A and Part B)
Safety gear:
- Vent fan or respirator mask
- Gloves and eye protection
Proper ventilation is essential when working with epoxy two-part tub paint. Open your windows and run a vent fan to manage fumes effectively. Wearing a mask protects your lungs during mixing and application.
Organizing materials before starting prevents interruptions and allows you to focus on sanding and caulk removal without delays.

PERFECT TUB REFINISHING KIT: Our tub and tile refinishing kit help you perfectly refinish porcelain ceramic surface like tub, tile, shower, vanities, sink, floors and wall. The bathtub paint kit can easily be used indoors or outdoors, providing a reliable bathtub paint solution. So invest in bathroom tile paint to get a like-new porcelain tile appearance in just a few days. This tub and tile paint is versatile for various surfaces.

【Broad Applicability】The tub paint is ideal for indoor and outdoor tiles, wood, glass,ceramics, acrylic, and marble surfaces like sinks, floors, bathtubs, walls.. Not suitable for artificial marble, metal, powdery or peeling substrates. Cast iron tubs (iron alloys with porcelain enamel) can be painted; regular iron tubs cannot

【Acrylic Formula】Our tub paint boasts an advanced water-based acrylic formula designed for durability and longevity. The high-quality acrylic resin ensures a strong, resistant finish that combats flaking and wear, providing a lasting transformation for your tiles
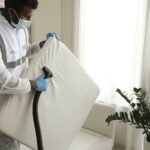
Remove Old Caulk to Prevent Adhesion Failure

Now that you’ve got your materials ready, it’s time to prep your tub’s surface. Start by removing old caulk around all edges and seams. Use a utility knife or caulk removal tool to scrape away buildup carefully. Old caulk prevents proper adhesion of your new coating.
Once you’ve finished caulk removal, you’re ready for masking. Apply painter’s tape around drains, spouts, and showerheads. This protects fixtures from paint exposure and ensures clean lines.
Next, sand your tub surface to roughen it up. Surface roughening improves adhesion significantly. Wipe everything down with a tack cloth to remove dust and residue. You’re now ready for the actual painting process. Proper prep work is essential for a successful finish.

Paint Roller kit 10 Pack: 2 inch foam paint roller covers 6 pack, 2 inch plastic paint tray, 2 inch paint tray liners 2 pack, small paint roller frame

Bates 2 inch foam paint roller kit comes in a 10-piece set, providing everything you need for small-scale painting projects.

Bates mini foam paint roller kit includes a roller frame and 2 foam covers, designed for precise and controlled paint application on small surfaces and detailed areas.
Clean and Degrease the Entire Surface

Now tackle any buildup and mildew that’s settled on your tub’s surface. Use a regular bathroom cleaner first, but if you’re dealing with stubborn grime, mineral spirits or TSP substitute will do the job. Once you’ve scrubbed everything clean, wipe the entire surface with a tack cloth to remove all dust and debris before moving forward.
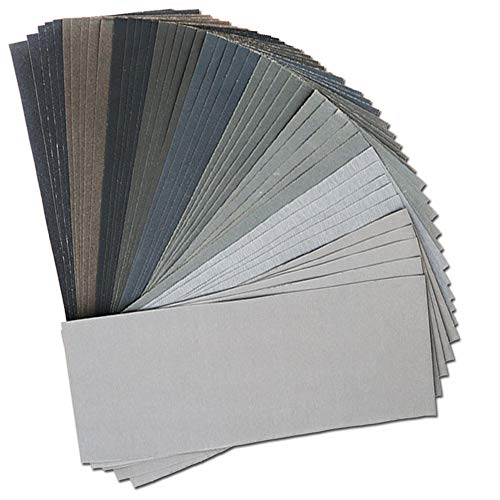
Wide Variety of Grit - Perfect selection of different grits, Including 5 sheets of each grit: 400/ 600/ 800/ 1000/ 1200/ 1500/ 2000/ 2500/ 3000, total 45 sheets.

BLEND PRIMER AND PAINT - 600 GRIT is perfect for scuffing primer before color base coat and refining the blend area before color base coat

15pcs sandpaper sheets in grit 400/600/800,each grit comes with 5 pcs sheets
Removing Buildup And Mildew
A clean bathtub surface is essential for paint to stick properly. Remove stubborn buildup and mildew so your paint adheres beautifully.
Removing Buildup and Mildew
Follow these steps:
- Scrub the entire bathtub with bathroom cleaner or TSP substitute
- Use mineral spirits for tough soap scum and buildup
- Target mildew spots with focused scrubbing action
- Rinse thoroughly and let the surface dry completely
- Wipe down with acetone for final prep
After cleaning, sand the surface with 220-grit sandpaper to roughen it for better bonding. This creates texture that helps paint grip. Then use a tack cloth to remove all dust particles.
Mask off edges with tape to protect surrounding areas. The bathtub is now ready for primer and paint application.
Choosing Appropriate Cleaning Agents
What’s the best way to prep your tub for paint? Selecting the right cleaning agents makes all the difference.
Start with a regular bathroom cleaner for initial mildew removal. It’ll handle most surface grime effectively. For stubborn soap scum and buildup, use mineral spirits or a TSP substitute. These powerful degreasers cut through tough residue that regular cleaners miss.
Follow this sequence:
- Apply bathroom cleaner first
- Use mineral spirits for heavy buildup
- Finish with acetone for a residue-free surface
Acetone removes final dust and chemical residue before painting. This ensures your epoxy paint bonds properly to the tub’s surface. Skipping this step results in paint that peels rather than adheres.
Sand With 400-Grit Sandpaper to Roughen

Now I’m going to sand your tub with 400-grit sandpaper to create a rough surface that helps paint stick better. You’ll use steady, even strokes across the entire tub, including curves and edges, to avoid gouges and get an even matte texture. This roughening step is essential because it gives your primer and paint something to grip onto, so they won’t peel off later.

Multifunction 3-in-1 Caulk Tool: Comfortable soft-grip and made from strong engineering plastic

Multifunctional design - Caulk remover,putty knives and all shapes caulking scraper could be used to tackle gaps of all sizes.Easily create clean edges, remove excess filler, and achieve professional results without messy cleanup.

【Tips】Here's a quick tip for achieving that smooth, one-handed gliding sensation with your grout tool: consider loosening the screws on the backside ever so slightly.While a bit of loosening can enhance the user experience, be careful not to overdo it. We're aiming for a perfect balance, so keep it within the range where the tool feels comfortably snug in your hand, providing that silky-smooth maneuverability.
Grit Selection And Application
Sanding creates the foundation for your epoxy coating to stick. 400-grit sandpaper gives you the perfect texture without being too aggressive.
- Use wet/dry 400-grit sandpaper across the entire tub surface
- Sand the surrounding area thoroughly for uniform texture
- Apply consistent pressure to create a rough key for epoxy bonding
- Work systematically so you don’t miss any spots
- Use the same grit for touch-ups later if needed
After sanding, wipe everything down with a tack cloth. This removes all dust particles that could ruin your finish. The tack cloth is essential, as dust trapped under epoxy creates imperfections that compromise coating adhesion and appearance. Taking time with this step extends the lifespan of your paint job and improves the final result.
Surface Roughening For Adhesion
Before your epoxy coating can stick properly, you’ll need to create a rough texture on your plastic tub’s smooth surface. Use 400-grit sandpaper for this step. Wet/dry sandpaper works best, giving you a uniform, slightly dull finish that boosts adhesion without gouging the plastic.
What to do:
- Sand the entire tub surface with steady, even pressure
- Scuff glossy edges and surrounding areas too
- Work until the shine disappears completely
After sanding, wipe everything down with a tack cloth. This removes all dust particles that could embed in your epoxy coating later. Skip this roughening step and you risk peeling and coating failure. Proper surface preparation is essential for long-term durability.
Remove Dust With a Tack Cloth

- Pick up fine particles that cleaning and sanding leave behind
- Work gently across all surfaces, edges, and corners
- Avoid pressing too hard to prevent lint embedding
- Ensure proper ventilation while removing dust particles
- Inspect thoroughly before applying primer or paint
Use light, sweeping motions across your entire tub. Pay special attention to crevices where dust accumulates. The tack cloth captures particles that regular cloths miss.
Once finished, inspect your work. If dust remains, make another pass. This ensures your paint adheres properly and produces professional results.

HEAVY-DUTY MULTI-SURFACE CLEANER - Designed to help remove grease, oil, tar, paint, dirt, caulk residue, grime, adhesive residue, and other everyday messes from a variety of hard surfaces.

POWERFUL DEGREASING ACTION: Our cleaner and degreaser product is specially formulated to tackle even the toughest grease and grime. It effectively breaks down and eliminates grease molecules, leaving surfaces sparkling clean.

POWERFUL DEGREASING ACTION: Our cleaner and degreaser product is specially formulated to tackle even the toughest grease and grime. It effectively breaks down and eliminates grease, leaving surfaces sparkling clean.
Tape Edges, Drains, Spouts, and Hardware
Protecting your fixtures and surrounding surfaces is the next essential step. Apply painter’s tape around all edges, drains, spouts, and the showerhead. This prevents paint from seeping onto areas you want to keep clean. Use delicate surface tape to avoid damage when removing it later.
| Area to Tape | Tape Type | Purpose |
|---|---|---|
| Tub edges | Painter’s tape | Prevent paint seepage |
| Drains | Delicate surface tape | Protect fixtures |
| Spouts | Painter’s tape | Clean paint lines |
Remove or cover hardware and chrome feet. Careful masking here minimizes edge imperfections. Press tape firmly to prevent lift or bleed-through between coats. Once the final coat sets, remove the tape for crisp, professional results.

Apply Tub and Tile Spray Paint to ceramic, porcelain or fiberglass including tiles, sinks and tubs

【Complete Tub and Tile Refinishing Solution】 Our all-inclusive tub and tile refinishing kit offers everything necessary for a seamless renovation. Whether you're a DIY hobbyist or a professional, this kit simplifies the process with user-friendly tools and clear instructions, making it ideal for both residential and commercial spaces.

Prepare and paint surface the same day with a tough, with tub and tile’s 2-part epoxy acrylic formula that withstands moisture and resists corrosion
Mix Two-Part Epoxy for at Least Five Minutes
I’ll mix Part A and Part B together thoroughly for at least five minutes to achieve the proper consistency. Blending them well ensures the epoxy will cure correctly and create a durable finish on the tub. Since epoxy paint has a short working time of about six hours after mixing, I need to use the batch quickly and efficiently.

Package Included 2 Inch high density foam paint roller covers 20 pieces

2“ Foam Paint Roller Kit: 2” density foam paint roller cover*6, 2“paint tray*1, 2“ liner*2, 2“ paint roller frame*1. The 2-inch paint roller set is versatile and can be used for various painting projects.

PAINT ROLLER COVERS - Avoid wasting paint, eliminate brush marks and achieve smooth even application by using Foam Pro's paint rollers for lint-free home painting projects. These foam roll brushes get the job done quickly, are easy to use, and offer a smooth, clean, and stress-free painting experience. Available in 9 inch, 9 inch x ¼ inch, 9 inch x ⅜ inch, and 9 inch x 1/2 inch packs of 1 and 3 foam covers
Two-Part Epoxy Mixing
Grab both parts of your epoxy and prepare for this essential step. You’ll need to mix these components thoroughly for at least five minutes. This mixing time ensures proper consistency and strong bonding on your bathtub surface.
Follow these steps:
- Pour both epoxy parts into a clean container
- Stir continuously for the full five minutes
- Scrape the container’s sides and bottom regularly
- Watch for a uniform color throughout the mixture
- Work in a well-ventilated area with windows open and a vent fan running
Thorough Blending Requirements
Getting your epoxy mixed properly is essential for success. The blending process directly impacts your final coating layers.
Mix the two-part epoxy paint for at least five minutes. This thorough blending ensures the components combine correctly. The mixture becomes uniform and reaches proper consistency.
Incomplete mixing creates weak spots in your finish. You won’t get the adhesion and durability required for a quality result.
Once blending is complete, work quickly. Your working time is limited; typically six hours pass before the epoxy paint begins curing. Apply the coating layers efficiently within this window.
Key Points:
- Mix for minimum five minutes
- Blend until completely uniform
- Use within six-hour window
- Stay focused on application timing
This foundation sets up everything that follows.
Working Time Management
Once you’ve mixed your epoxy for the full five minutes, the clock starts ticking. You have about six hours before it becomes unusable. Managing your epoxy working time effectively requires these steps:
- Work in sections to avoid wasting product before you finish
- Maintain good ventilation throughout your entire painting process
- Apply coating in sections rather than the whole tub at once
- Monitor drying time between coats carefully for best results
- Don’t rush and take breaks to ensure quality application
Start with smaller areas first. This approach lets you stay focused and prevents the epoxy from hardening on your roller. You’ll build confidence tackling manageable sections. Between coats, allow proper drying time so each layer sets completely. Planning ahead ensures you’ll complete your project successfully.
Apply the First Coat With Even Strokes
Now you’re ready to paint. Shake or stir your two-part epoxy thoroughly until completely mixed. Pour it into a shallow tray for easier access.
Thoroughly shake or stir your two-part epoxy until completely mixed, then pour into a shallow tray for easier access.
Load your foam roller lightly to avoid drips and splatters. Using even, overlapping strokes, apply the coat across the tub surface. Work methodically from the farthest corner toward your exit point. This approach minimizes dust and ensures consistent coverage.
For corners and edges:
- Use a foam brush to paint tight areas first
- Blend these sections with your roller afterward
- This technique reduces visible brush marks
Keep your strokes smooth and uniform. Don’t overload the roller; multiple thin passes work better than one heavy application. Once you’ve covered the entire surface, allow the coat to set according to product instructions before assessing whether you need a second coat.

Package contains 60pcs 6 different grades sanding discs: 1000/800/600/400/320/240 grits, 10 of each type.

【PREMIUM MATERIAL】: Sandpapers Made Made from aluminium oxide for longer life; electro coated technology make grit distributed evenly; Will not fall apart, tear or crumble off during using。

This product includes 100 pieces of 5-inch 600-grit hook and loop velcro gold sandpaper, packed in a single box
Sand Lightly and Reapply Coats
After your first coat dries completely, you’ll want to sand the surface lightly. This step creates a smooth finish and helps coats bond together properly.
What you’ll do:
- Use 400-grit sandpaper to scuff the entire bathtub surface evenly
- Wipe away all dust with a tack cloth for a clean finish
- Wait the recommended drying times between coats, typically 1–2 hours
- Apply your second coat with the same even strokes as before
- Repeat light sanding after the second coat to smooth imperfections
Before applying each new layer, ensure the surface is completely dry and dust-free. This prevents blemishes and keeps your finish looking professional. Each step in the layering process directly affects the durability and appearance of your final result.

Versatile Tool for All Skill Levels: Perfect for professionals, homeowners, and DIY enthusiasts alike

Used to cut old caulk from joints prior to re-calking

❤️【Multifunctional Caulking Tools】The 5 in 1 upgraded caulking remover tools can not only help you repair the gap and clean the residual glue, but also help you fill the caulk with glue. It will improve the agglutinating quality and the aesthetic sense of surface.
Allow Full Cure Time Before Reintroducing Water
You’ve applied your coats and sanded them smooth, but you’re not quite done yet. The epoxy cure period is essential for protecting your investment.
Wait at least three days before exposing your tub to water. This full cure time lets the finish harden completely and bond to your plastic surface.
Here’s what happens during this waiting period:
- Day 1-2: The epoxy begins setting, though it’s still vulnerable
- Day 3: Water exposure becomes safe for most products
- After full cure: You can enjoy your newly painted tub
Don’t rush this step. Early water exposure weakens the finish and shortens its lifespan. If you’re re-caulking, wait two days after your final coat before starting that work.
Skipping this cure time will compromise the durability of your finish.